
Website Using Hugo and AWS
My first post will be about the choices made during the development of this website. For every project, being it a website or a game, I always try to select tools and frameworks that are industry standards. Its good for us to know that, even using some tools and helpers, there were always undocumented problems during the process.
CMS and Theme
My first decision was to use some CMS tool to develop the site. The logic choice was to use Wordpress, but as a great adept of serverless tools I thought will be better, easier and cheaper to use a static site generator like Hugo. The generated package can be hosted directly to a CDN without the need of managing servers, and there’s also a great amount of templates to easily create the site structure.
The next task is to choose the theme for the site. I wanted it to be visually simple but with lots of options to customize. So I choose the FeelIt, a very complete theme which has templates for inicial and profile pages (without the need to code it), configurations for multiple languages and extended shortcodes for many types of diagrams. For the documentation about what are shortcodes, see the official Hugo documentation.
Hosting
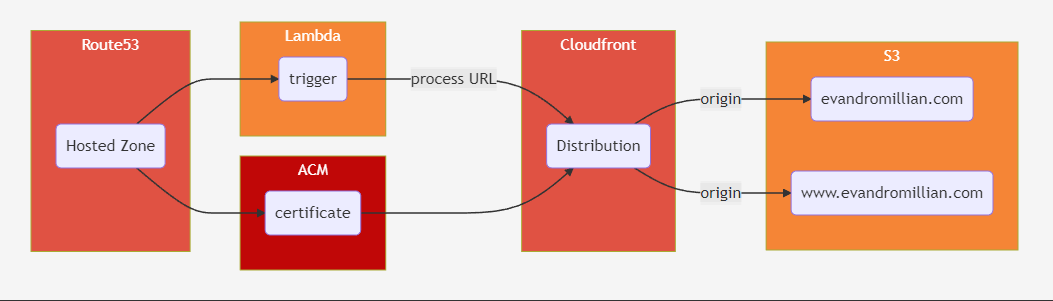
For the hosting service it’s better to use a cloud provider, and among all the options I selected AWS, that is which I used for other projects earlier. I created manually the resources, because some of them could not be created by a CloudFormation stack, and I didn’t want to use Terraform nor another external tool for the deploy.
The required stack is a combination of many services, as showed in the diagram below:
S3 Storage Bucket
Let’s starting by creating the S3 bucket and configuring it for static hosting:
- In the S3 console, select the Buckets screen then click in Create Bucket button.
- Set Bucket name with your domain’s name prefixed by “www.”, and select the region with care, because all other resources should be in the same region.
- Then clear the Block all public access option, and click the acknowledge option that opens below.
- Click in Create Bucket button and wait for the process to complete.
- Then click in your new bucket in the bucket list, then click the tab Properties. Search for the section Static website hosting and click the Edit button.
- In the Edit static website hosting screen, click the Enable option, set Index document value as index.html then save the changes.
- Then you’ll need to add permissions for the containing files to be accessed from the webpage. Click the tab Permissions, edit the secion Bucket policy. Add the following text to the text area, replacing DOMAIN_NAME to your domain (e.g. evandromillian.com), then save the changes:
{
	"Version": "2008-10-17",
	"Id": "S3Policy",
	"Statement": [
		{
			"Sid": "AddPerm",
			"Effect": "Allow",
			"Principal": "*",
			"Action": "s3:GetObject",
			"Resource": "arn:aws:s3:::www.DOMAIN_NAME/*"
		}
	]
}
Now your bucket is ready to host your new website. If you are using Hugo, you can deploy your website directly from command line. Add the following lines to your config.toml file, replacing DOMAIN_NAME and REGION by the values used for your website:
[[deployment.targets]]
name = ""
URL = "s3://www.DOMAIN_NAME?region=REGION"
In command line, type hugo && hugo deploy to build and deploy your website to the S3, respectively.
To know the bucket’s URL, select the tab Properties then the section Static website hosting. As the static hosting is enabled, the URL will be displayed in the section.
S3 Redirect Bucket
We need another S3 bucket to redirect call from non-www to www:
- In the S3 console, select the Buckets screen then click in Create Bucket button
- Set Bucket name with your domain’s name, and select the same region used by the first bucket
- Click in Create Bucket button and wait for the process to complete.
- Then click in your new bucket in the bucket list, then click the tab Properties. Search for the section Static website hosting and click the Edit button.
- In the Edit static website hosting screen, click the Enable option, click the option Redirect requests for an object, set the field Host name with the domain name prefixed by “www.”, set Protocol option as http, and finally save the changes.
Cloudfront
The next step is to configure a new distribution in Cloudfront. Although the website can be exposed by a S3 bucket, Cloudfront has some desirable features:
- It allows the website be accessed as HTTPS, by associating a SSL certificate to it
- As a CDN, it caches the website to points of presence around the world, nearer to the users
To create a Cloudfront distribution, open the Cloudfront console, click on the Create distribution button and follow the steps:
- Fill the field Origin domain with the website’s domain
- In the section Default cache behavior, select the option Redirect HTTP to HTTPS
- In the section Settings, add two Alternate domain names, one as your domain name and other with the domain name prefixed by “www.”
- Confirm the option IPv6 is on
- Keep the other values as default and click the Create distribution button
If the origin (in our case, the S3 bucket) is refreshed, Cloudfront needs 24 hours to be updated. Fortunately there’s a configuration in the Hugo config.toml to invalidade the cache. Add the field cloudFrontDistributionID with the this distribution’s ID:
[[deployment.targets]]
name = ""
URL = "s3://www.DOMAIN_NAME?region=REGION"
cloudFrontDistributionID = "DISTRIBUTION_ID"
After that, calls hugo && hugo deploy to update deploy changes in the website and refresh the Cloudfront caches.
To test if everything is working, open the Cloudfront console, copy the distribution’s Domain name in the distributions list and past in your browser to see the website opened.
Cloudfront Bug
During the tests with the Cloudfront distribution, I discovered that it doesn’t handle the URL format for Hugo sections (URL without a page name, /about or /portfolio).
Basically there are two ways to handle this problem: rewrite all links or using a Lambda to rewrite the URL to append index.html at the end of each request. I choose for the second options, because I don’t want to change the current and future links for all pages. Also, its a good options to start learning about Lambda@Edge and some of its use cases.
So let’s create the trigger lambda in the following steps:
- Access the Lambda console and click the Create function
- Use the template Author from scratch
- Runtime should be Node.js XX, as our code sample is written with this language
- Architecture should be x86_64 to allow deployment to Lambda@Edge
- For Change default execution role, select the Create a new role with basic Lambda permissions option
- Click the Create function button to proceed
- In the function screen, paste the following code in Code source area:
'use strict';
exports.handler = (event, context, callback) => {
    // Extract the request from the CloudFront event that is sent to Lambda@Edge,
    // then extract the URI from the request
    var request = event.Records[0].cf.request;
    var olduri = request.uri;

    // Match any '/' that occurs at the end of a URI. Replace it with a default index
    request.uri = olduri.replace(/\/$/, '\/index.html');

    // Return to CloudFront
    return callback(null, request);
};
- Click the Deploy button to commit the code
For the function to intercept Cloudfront requests, we need to add some permissions to its role:
- In the Configuration tab, select the Permissions option
- Click the link role inside Execution Role section to open role configuration
- Now inside IAM console, select Trust relationships tab
- Click the Edit trust policy button at the right of Trusted entities section
- We need to add Lambda@Edge as a trusted entity to call our function. For this replace the policy by the snippet below (not the addition of edgelambda.amazonaws.com):
{
	"Version": "2012-10-17",
	"Statement": [
		{
			"Effect": "Allow",
			"Principal": {
				"Service": [
					"lambda.amazonaws.com",
					"edgelambda.amazonaws.com"
				]
			},
			"Action": "sts:AssumeRole"
		}
	]
}
- Click the Update policy button to confirm the changes, and close the IAM console
Back to the Lambda console, we can finally associate the function with the Cloudfront distribution:
- In the Configuration tab, select the Triggers option and click Add trigger button
- In the Add trigger screen, select the option Cloudfront
- Click the button Deploy to Lambda@Edge
- In the Deploy to Lambda@Edge dialog, select the distribution you want to associate (the ID from Cloudfront console), select Origin request in Cloudfront event, click Confirm deploy do Lambda@Edge checkbox and finalize with Deploy button
Now we can test the distribution that is redirecting to all pages correctly. In Cloudfront console, copy the distribution’s Domain name in the distributions list and past in your browser to see the website opened.
Assets
Favicon
To create the favicon, I used a service like Red Ketchup, that generates images for desktop and mobile browsers in one package. It also has the options to generate rounded icon. Copy all images in the static folder in your project structure.
Images
There are many sites that provide free images for the posts. I used StockFreeImages for some images.
Conclusion
I hope this help how to create and deploy a Hugo website in a easy way. In future we can use a CloudFormation stack to create the whole structure in AWS, as well as compare the complexity when using other providers like Google, Azure and Digital Ocean.